You ARE creative. Let me inspire you!
Need to reach out? Email me at brenda@angelwhispersart.com
Last weekend my BFF Karen and I took a class with Julie Haymaker Thompson. Julie owns Bliss Bee, a charming little shop in Bisbee, Arizona. We took Julie’s House of Dreams class which exposed us to a variety of mixed media techniques. It was AWESOME! I recommend it to everyone! We learned so much and I cannot wait to use some of the techniques on another piece – I have so many ideas spinning around in my head for my next mixed media project but that is for another post.
Julie is a wonderful teacher and we are so blessed to have her nearby. I know we will be back for more classes. Her shop is filled with mixed media art supplies and lots of art treasures too. If you are ever in Bisbee, Arizona you MUST stop in and enjoy everything it has to offer!

Here is the House of Dreams piece that Julie created and which we used as our inspiration. We could have made any design we wanted to use but Karen and I thought it best to create our own House of Dreams. Julie worked on a completely different project using all the same techniques.

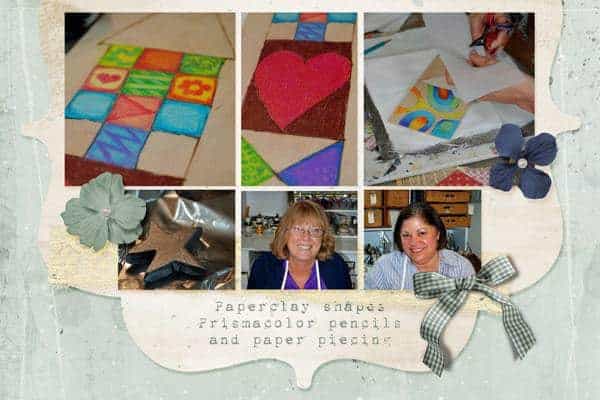
We started out with a thin piece of wood and a frame. We painted the frame with a paint and treatment that made it look rusted. While the frame was drying, we drew our design on the wood paned and then went over the lines with a wood-burning tool. It was the first time I’d ever used a wood-burning tool and it took me a bit to get used to it. I did get the hang of it and now it is on my wish list of tools.

After erasing our pencil lines, the next step was to add color to our design. I was surprised to learn that we were going to use Prismacolor pencils. This step was fun – I loved coloring! We took a break from coloring to create some shapes using Paperclay. We rolled it out and used small cookie cutter shapes. The shapes were set aside to dry. When the shapes were dried we painted them silver and again, set them aside to dry.
Karen and I had so much fun! Can you tell? OK, on to the next steps. We finished the coloring and then we cut templates out tissue paper that we used to cut pieces of old book pages and patterned paper. The paper pieces were added using gel medium and then we covered the piece with gel medium and used a heat tool to dry it. We painted the background black and set the pieces aside to dry. When the pieces were dry we covered them with more gel medium, this time a heavier version, and then we played and made designs in the gel medium. Once again, the pieces were set aside to dry. This time while we waited we worked on some embellishments for the piece. Julie already had shapes cut out of felt for us. There was so much to do and only 8 hours to work! We dyed the felt shapes in coffee and once they were dry we stitched them with black thread and added small metal pieces that Julie calls “findings” and beads.

When the paint was dry we painted over the house with a copper metallic paint then rubbed it off. This was a cool antiquing technique. We used the heat tool again to dry the piece and then we used the stabilo pencils to draw outlines around the piece. The wood-burning helped to guide the pencil. The cool thing about the stabilo pencils was that there is a bit of wax in the pencil and as we drew the lines we rubbed the lines with our finger. The heat from our finger melted the wax enough to spread out the line and give the piece a bit of shading. We went over the lines with a damp paint brush to further define the outlines. I really loved the look! The next step was to add crackle paint over the black background and then, you guessed it, we set is aside to dry again. We used the drying time to go back to our painted Paperclay pieces and add glitter. We painted them with gel medium and sprinkled glitter, okay sprinkle is not quite right. We dumped glitter on the shapes then tapped off the excess and set them aside. And when the crackle paint was dry we touched up the lines with the stabilo pencils and even added more designs with colored stabilo pencils. When we were happy with all the lines we sprayed the piece with fixative so that the lines would not smear. Then we painted gel with mica flakes over the crackle paint.
We were almost done. We placed the pieces in the frames and added our embellishments to the piece. I added flowers, buttons, rhinestones, and findings to mine. We glued the stars to the frame and our House of Dreams was complete!

And here we are with our final projects.


There were so many techniques we learned that it is possible, even likely that I have gotten some out of order in my story above. I hope I haven’t left anything out. Karen and I had a fantastic day creating our artwork. Julie was great and I can’t wait until our next class!
I used the following Scrap Girls products to create the layouts and add to the photos above.
Angie Briggs’ Exhale Collection Mini, Syndee Nuckles’ ScrapSimple Paper Templates: Quick Collage, Syndee Nuckles’ ScrapSimple Tools – Actions: Resize it, Sarah Batdorf’s ScrapSimple Tools – Styles: Basic Shadows 6501, Brandy Hackman’s Sweet Street Grunge Collection Biggie, Brandy Hackman’s Modern Walls Nano Collection, Brandy Hackman’s City Slick Nano Collection, Jan Hicks’s Lace Embellishments – Set 2 (retired), Brandy Murray’s ScrapSimple Embellishment Templates: Trinket Charms, Brandy Murray’s ScrapSimple Embellishment Templates: Ribbons To Go II, Cherise Oleson ‘s ScrapSimple Embellishment Templates: Fabric Pieces, Brandy Murray’s ScrapSimple Embellishment Templates: Bows To Go I
The font I used is 1942 report.